


Table of contents
- What is CSS?
- But, how is CSS helpful?
- CSS Syntax:
- Types of CSS:
- CSS Selectors:
- CSS Positions:
- CSS Properties:
- Conclusion:
Before We get started let's learn some basics:
What is CSS?
Well, CSS (Cascading Style Sheets) describes how HTML elements are to be displayed on screen, paper, or in other media. CSS saves a lot of work. It can control the layout of multiple web pages all at once. CSS is used to define styles for your web pages, including the design, layout and variations in display for different devices and screen sizes.
The style definitions are normally saved in external .css files. With an external stylesheet file, you can change the look of an entire website by changing just one file.
But, how is CSS helpful?
CSS makes the front-end of a website shine and it creates a great user experience. Without CSS, websites would be less pleasing to the eye and likely much harder to navigate. In addition to layout and format, CSS is responsible for font color and more.
CSS Syntax:
A CSS Syntax rule consists of a selector, property, and its value. The selector points to the HTML element where CSS style is to be applied. The CSS property is separated by semicolons. It is a combination of selector name followed by the property: value pair that is defined for the specific selector.
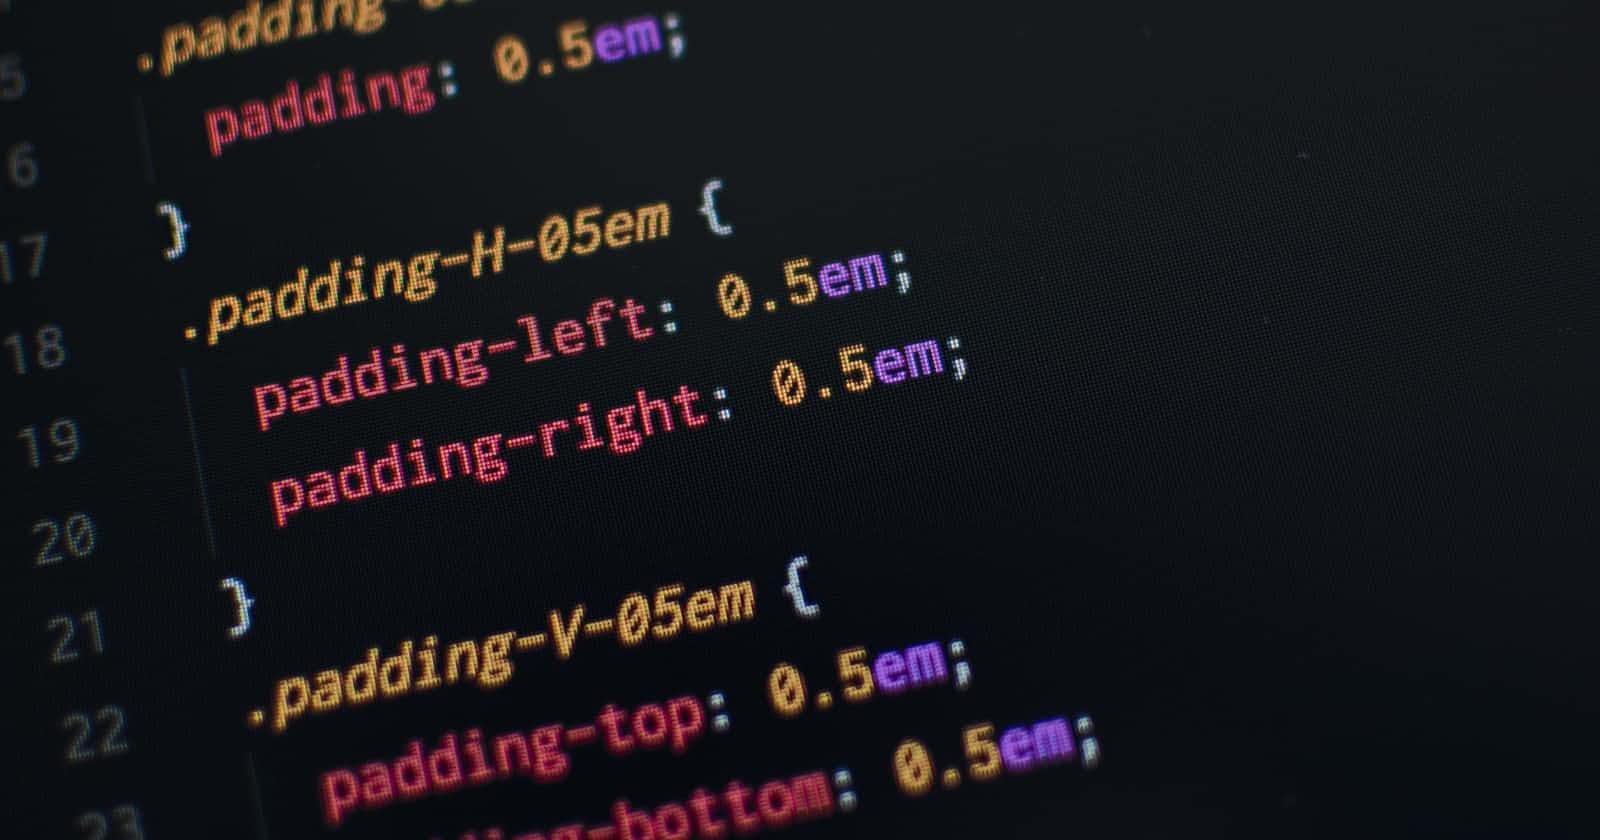
Syntax:
selector { Property: value; }
Every declaration has a CSS property name and a value, separated by a colon and is surrounded by curly braces. For declaring the multiple CSS properties, it can be separated by the semicolon.
Example: This example illustrates the use of CSS Syntax for the styling of HTML elements.
h1{
  color:#FF0000;
  font-size:50px;
 text-align: center;
}

Example Explained:
- h1 is a selector in CSS (it points to the HTML element you want to style:
<h1>). - font size is a property, and 50px is the property value
- color is a property, and #FF0000(red) is the property value
- text-align is a property, and center is the property value
Types of CSS:
There are three types of CSS :
- Inline CSS
- Internal or Embedded CSS
- External CSS
Inline CSS:
Inline CSS contains the CSS property in the body section attached with element is known as inline CSS. This kind of style is specified within an HTML tag using the style attribute.
Example:
<html>
<head>
</head>
 <body>
<!--  style attribute is used for inline css-->
    <h1 style="color: #07b6f5;
        text-align: center;
        font-size:50px;
        font-family: Poppins,sans-serif;">Inline CSS</h1>
</body>
</html>

Internal or Embedded CSS:
This can be used when a single HTML document must be styled uniquely. The CSS rule set should be within the HTML file in the head section i.e the CSS is embedded within the HTML file.
Example:
<!DOCTYPE html>
<html>
<head>

    <!-- Style of h1 selector -->
    <style>
    h1 {
        color: #07f58a;
        text-align: center;
        font-size:50px;
        font-family: Poppins,sans-serif;
    }
    </style>
</head>
<body>
    <h1>Internal or Embedded CSS</h1>
</body>
</html>

External CSS:
External CSS contains separate CSS file which contains only style property with the help of tag attributes (For example class, id, heading, … etc). CSS property written in a separate file with .css extension and should be linked to the HTML document using link tag. This means that for each element, style can be set only once and that will be applied across web pages.
Example: The file given below contains CSS property. This file save with .css extension. For Ex: External.css
Example:
External.css:
 h1 {
        color: #f57a07;
        text-align: center;
        font-size:50px;
        font-family: Poppins,sans-serif;
    }
HTML file:
<!DOCTYPE html>
<html>
    <head>
        <link rel="stylesheet" href="External.css"/>
    </head>
    <body>
        <h1>External CSS</h1>
        </div>
    </body>
</html>

CSS Selectors:
CSS Selectors are used to selecting HTML elements based on their element name, id, attributes, etc. It can select one or more elements simultaneously.
CSS Selector can be classified into 5 categories:
- Simple Selector: It is used to select the HTML elements based on their element name, id, attributes, etc.
- Combinators Selector: It is used for explaining the relationship between two selectors.
- Pseudo-classes Selector: It is used to define the special state of an element.
- Pseudo Elements Selector: It is a keyword added to a selector that lets you style a specific part of the selected elements.
- Attribute Selector Selector: It is used to select an element with some specific attribute or attribute value.
Let us see all the types of CSS selectors in detail.
1. Simple Selector:
The CSS element Selector:
The element selector selects HTML elements based on the element name.
Example:
Here, all <p> elements on the page will be selected and styled:
 p {
        color: blue;
        text-align: center;
        font-size:20px;
        font-family: Poppins,sans-serif;
    }

The CSS id Selector:
The id selector uses the id attribute of an HTML element to select a specific element. The id of an element is unique within a page, so the id selector is used to select one unique element! To select an element with a specific id, write a hash (#) character, followed by the id of the element.
Example:
Here, the element with id="para" attribute on the page will be selected and styled:
 #para {
        color: green;
        text-align: center;
        font-size:20px;
        font-family: Poppins,sans-serif;
    }

Note: An id name cannot start with a number!
The CSS class Selector:
The class selector selects HTML elements with a specific class attribute. To select elements with a specific class, write a period (.) character, followed by the class name.
Example: In this example all HTML elements with class="text" attribute on the page will be selected and styled:
 .text{
        color: violet;
        text-align: center;
        font-size:20px;
        font-family: Poppins,sans-serif;
    }

You can also specify that only specific HTML elements should be affected by a class.
Example:
In this example only <p> elements with class="text" will be selected and styled:
 p.text{
        color: violet;
        text-align: center;
        font-size:20px;
        font-family: Poppins,sans-serif;
    }

HTML elements can also refer to more than one class.
Example:
In this example the
element will be styled according to class="style" and to class="large":
/* css file */
 style{
        color: violet;
        font-family: Poppins,sans-serif;
    }
large{
        font-size:50px;
}
 <!--  html file-->
<!DOCTYPE html>
<html>
    <head>
        <link rel="stylesheet" href="External.css"/>
    </head>
    <body>
        <p class="style large">I am a paragraph with two classes style and large </p>
        </div>
    </body>
</html>

Note: A class name cannot start with a number!
The CSS Universal Selector:
The universal selector (*) selects all HTML elements on the page.
Example: The CSS rule below will affect every HTML element on the page:
* {
background-color:black;
  text-align: center;
  color: blue;
font-family: Poppins,sans-serif;
}

The CSS Grouping Selector:
The grouping selector selects all the HTML elements with the same style definitions. To use group selector, separate each selector with a comma.
Example:
h1, h2, p {
  text-align: center;
  color: red;
  font-family: Poppins,sans-serif;
}

2. Combinators Selector:
A combinator is something that explains the relationship between the selectors.
A CSS selector can contain more than one simple selector. Between the simple selectors, we can include a combinator.
There are four different combinators in CSS:
- descendant selector (space)
- child selector (>)
- adjacent sibling selector (+)
- general sibling selector (~)
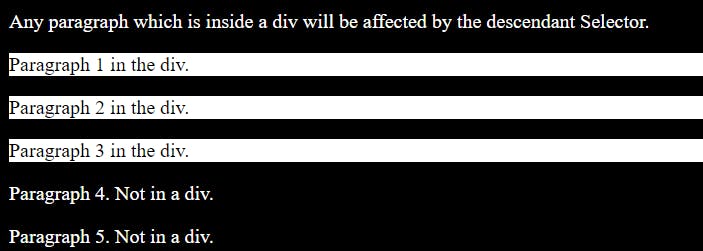
Descendant Selector (space):
The descendant selector matches all elements that are descendants of a specified element.
The following example selects all <p> elements inside <div> elements:
<!DOCTYPE html>
<html>
<head>
<style>
body{
background-color: black;
}
p{
color:white
}
/*  descendant Selector */
div p {
  background-color: white;
  color:black;
}
</style>
</head>
<body>

<p>Any paragraph which is inside a div will be affected by the descendant Selector.</p>

<div>
  <p>Paragraph 1 in the div.</p>
  <p>Paragraph 2 in the div.</p>
  <p>Paragraph 3 in the div.</p>
</div>

<p>Paragraph 4. Not in a div.</p>
<p>Paragraph 5. Not in a div.</p>

</body>
</html>
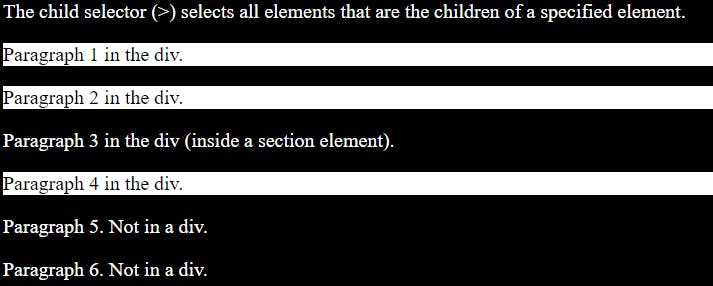
Child Selector (>) :
The child selector selects all elements that are the children of a specified element.
The following example selects all <p> elements that are children of a <div> element:
<!DOCTYPE html>
<html>
<head>
<style>
body{
background-color: black;
}
p{
color:white
}
/* child selector */
div > p {
color:black;
  background-color: white;
}
</style>
</head>
<body>
<p>The child selector (>) selects all elements that are the children of a specified element.</p>

<div>
  <p>Paragraph 1 in the div.</p>
  <p>Paragraph 2 in the div.</p>
  <section>
    <!-- not Child but Descendant -->
    <p>Paragraph 3 in the div (inside a section element).</p>
  </section>
  <p>Paragraph 4 in the div.</p>
</div>

<p>Paragraph 5. Not in a div.</p>
<p>Paragraph 6. Not in a div.</p>

</body>
</html>
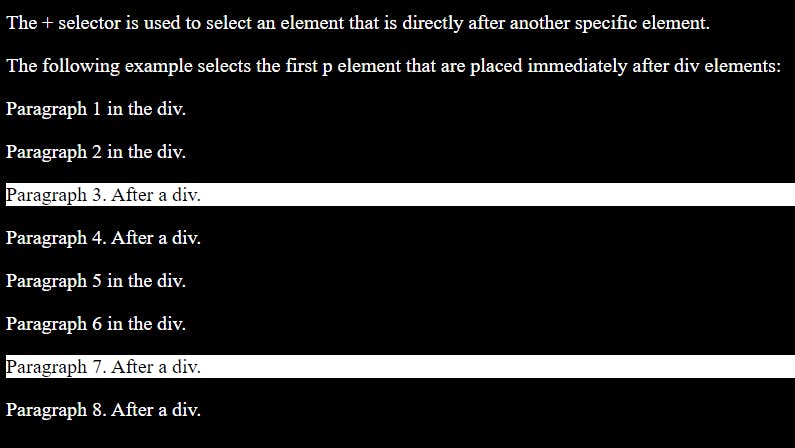
Adjacent Sibling Selector (+):
The adjacent sibling selector is used to select an element that is directly after another specific element.
Sibling elements must have the same parent element, and "adjacent" means "immediately following".
The following example selects the first <p> element that are placed immediately after <div> elements:
<!DOCTYPE html>
<html>
<head>
<style>
body{
background-color: black;
}
p{
color:white
}
/* Adjacent Sibling  selector */
div + p {
color:black;
  background-color: white;
}
</style>
</head>
<body>
<p>The + selector is used to select an element that is directly after another specific element.</p>
<p>The following example selects the first p element that are placed immediately after div elements:</p>

<div>
  <p>Paragraph 1 in the div.</p>
  <p>Paragraph 2 in the div.</p>
</div>

<p>Paragraph 3. After a div.</p>
<p>Paragraph 4. After a div.</p>

<div>
  <p>Paragraph 5 in the div.</p>
  <p>Paragraph 6 in the div.</p>
</div>

<p>Paragraph 7. After a div.</p>
<p>Paragraph 8. After a div.</p>

</body>
</html>
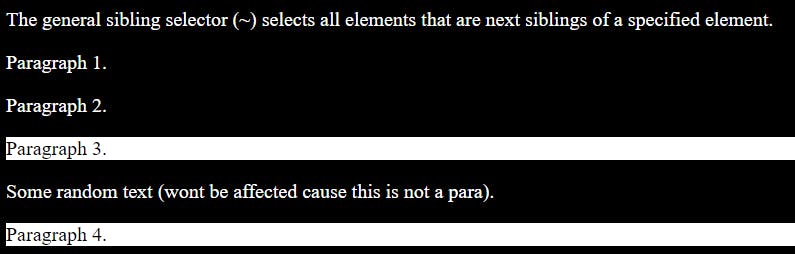
General Sibling Selector (~):
The general sibling selector selects all elements that are next siblings of a specified element.
The following example selects all <p>elements that are next siblings of <div>elements:
<!DOCTYPE html>
<html>
<head>
<style>
body{
background-color: black;
color:white
}

/* General Sibling Selector */
div ~ p {
color:black;
  background-color: white;
}
</style>
</head>
<body>


<p>The general sibling selector (~) selects all elements that are next siblings of a specified element.</p>

<p>Paragraph 1.</p>

<div>
  <p>Paragraph 2.</p>
</div>

<p>Paragraph 3.</p>
<text>Some random text (wont be affected cause this is not a para).</text>
<p>Paragraph 4.</p>

</body>
</html>
3. CSS Pseudo-classes:
What are Pseudo-classes?
A pseudo-class is used to define a special state of an element.
For example, it can be used to:
- Style an element when a user mouses over it
- Style visited and unvisited links differently
- Style an element when it gets focus
The syntax of pseudo-classes:
selector:pseudo-class {
  property: value;
}
Here is a small demo of what can be achieved with pseudo-classes:
a
{
  display: inline-block;
  font-size: 1em;
  background: #fff;
  padding: 10px 30px;
  text-transform: uppercase;
  text-decoration: none;
  font-weight: 500;
  margin-top: 10px;
  color: #111;
  letter-spacing: 2px;
  transition: 0.2s;
}
a:hover
{
  letter-spacing: 6px;
}

Here is a cheatsheet to every pseudo-classes selectors:Cheat Sheet
4. CSS Pseudo-elements:
What are Pseudo-Elements?
A CSS pseudo-element is used to style specified parts of an element.
For example, it can be used to:
- Style the first letter, or line, of an element
- Insert content before, or after, the content of an element
The syntax of pseudo-elements:
selector::pseudo-element {
  property: value;
}
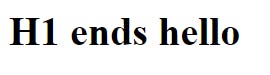
::before Pseudo-element:
The ::before pseudo-element can be used to insert some content before the content of an element.
The following example inserts 'hello' before the content of each <h1> element:
h1::before {
  content: "hello";
}

::after pseudo-element:
The ::after pseudo-element can be used to insert some content after the content of an element.
The following example inserts 'hello' after the content of each <h1> element:
h1::after{
  content: "hello";
}
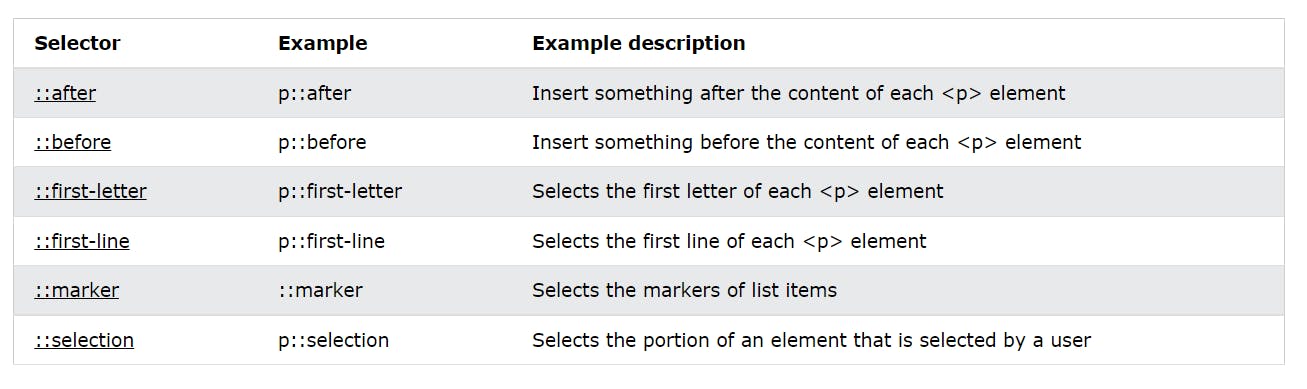
Here is a list of all the pseudo-elements selectors:
5. CSS Attribute Selectors:
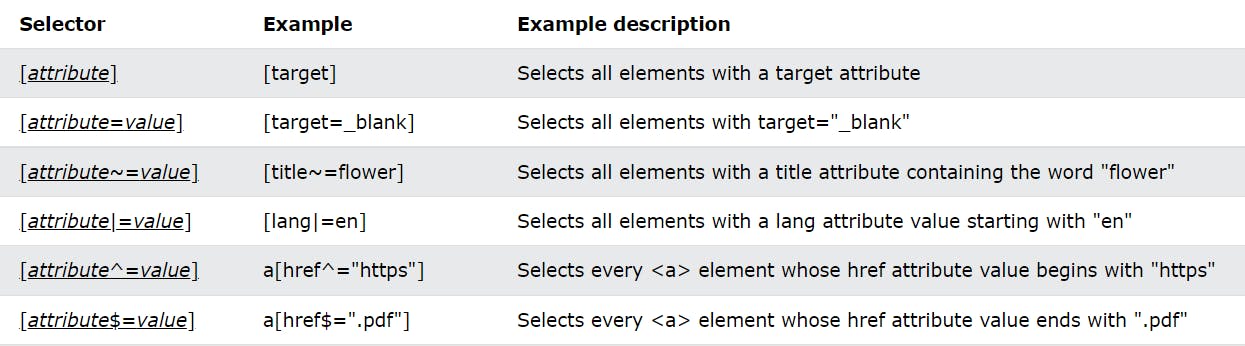
The [attribute] selector is used to select elements with a specified attribute.
The following example selects all <p> elements with "class="selectme" attribute:
p[class=selectme] {
  color: yellow;
}
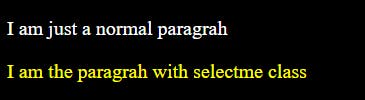
Here is a list of all the attribute selector:
CSS Positions:
The position property specifies the type of positioning method used for an element (static, relative, fixed, absolute or sticky).
The position property specifies the type of positioning method used for an element.
There are five different position values:
- static
- relative
- fixed
- absolute
- sticky
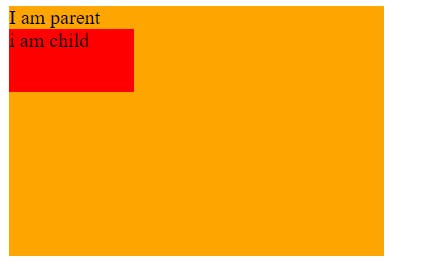
position: static; :
HTML elements are positioned static by default.
Static positioned elements are not affected by the top, bottom, left, and right properties.
An element with position: static; is not positioned in any special way; it is always positioned according to the normal flow of the page:
Example:
.parent{
  width:300px;
  height:200px;
  background:orange;
}
.child{
  width:100px;
  height:50px;
   background:red;
  position:static;

}
when the position is set to static the elements render in order, as they appear in the document flow.
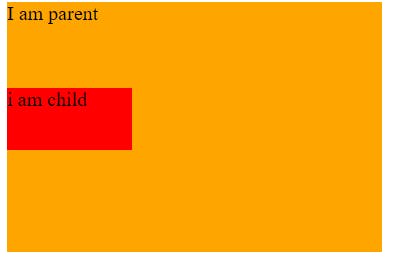
position: relative; :
An element with position: relative; is positioned relative to its normal position.
Setting the top, right, bottom, and left properties of a relatively-positioned element will cause it to be adjusted away from its normal position. Other content will not be adjusted to fit into any gap left by the element.
Example:
.parent{
  width:300px;
  height:200px;
  background:orange;
}
.child{
  width:100px;
  height:50px;
   background:red;
  top:50px;
  position:relative;

}
Here the child object is set to relative and a top property of 50px is given. So the child object moves 50px from the top.
position: absolute; :
Absolute positioning allows you to place your element precisely where you want it.
An element with position: absolute; is positioned relative to the nearest positioned ancestor (instead of positioned relative to the viewport, like fixed).
However; if an absolute positioned element has no positioned ancestors, it uses the document body, and moves along with page scrolling.
Note: Absolute positioned elements are removed from the normal flow, and can overlap elements.
Example:
.parent{
  width:300px;
  height:200px;
  background:orange;
}
.child{
  width:100px;
  height:50px;
   background:red;
  position:absolute;

}
.child2{
  width:100px;
  height:50px;
   background:green;
}
When the element is set to absolute it completely overlaps with the other element.

position: sticky; :
An element with position: sticky; is positioned based on the user's scroll position.
A sticky element toggles between relative and fixed, depending on the scroll position. It is positioned relative until a given offset position is met in the viewport - then it "sticks" in place (like position:fixed).
Example:
.parent{
  width:300px;
  height:500px;
  background:orange;
}
.child{
  width:100px;
  height:50px;
   background:red;
top:0px;
  position:sticky;

}
.child2{
  width:100px;
  height:50px;
   background:green;
  position:relative;

}
The sticky element sticks to the top of the parent element while scrolling.

position: fixed; :
An element with position: fixed; is positioned relative to the viewport, which means it always stays in the same place even if the page is scrolled. The top, right, bottom, and left properties are used to position the element.
A fixed element does not leave a gap in the page where it would normally have been located.
Example:
.parent{
  width:300px;
  height:500px;
  background:orange;
  position: relative;
  top:500px;
}
.child{
  width:100px;
  height:50px;
   background:red;
top:0px;
  position:fixed;

}
.child2{
  width:100px;
  height:50px;
   background:green;
  position:relative;

}
An element with position: fixed; is positioned relative to the viewport, which means it always stays in the same place even if the page is scrolled:

CSS Properties:
Here is a cheat sheet to every CSS property: https://www.tutorialrepublic.com/css-reference/css3-properties.php
Conclusion:
Congrats you just learned CSS now go build your amazing webpage :) . Thank you for reading my article. Any feedback is appreciated :) .
Check out my article on HTML: A quick guide to HTML.
Check out my Tic Tac Toe Game: Tic Tac Toe
Cheers 🍻 and have a great day :)