


Before We get into HTML let's learn some basics:
What is a website?
Well, A website is a collection of linked web pages (plus their associated resources) that share a unique domain name.
There are two types of Websites namely: Static and Dynamic.
Any website which doesn't have a backend and only shows the information hardcoded to it is static. Websites which has a backend and are dynamically updated are dynamic.
An Introduction to HTML
HyperText Markup Language (HTML) is the basic scripting language used by web browsers to render pages on the world wide web. HTML allows web users to create and structure sections, paragraphs, and links using elements, tags, and attributes. However, it’s worth noting that HTML is not considered a programming language as it can’t create dynamic functionality.
HTML documents are files that end with a .html or .htm extension. A web browser reads the HTML file and renders its content so that internet users can view it.
Now lets get into the actual part.
<!DOCTYPE html>
<html lang="en">
<head>
    <meta charset="UTF-8">
    <meta http-equiv="X-UA-Compatible" content="IE=edge">
    <meta name="viewport" content="width=device-width, initial-scale=1.0">
    <title>Document</title>
</head>
<body>

</body>
</html>
This is generally how a HTML file looks like.
Let us see in detail what these tags actually mean.
1. <!DOCTYPE>
All HTML documents must start with a
<!DOCTYPE>
declaration. It is an "information" to the browser about what document type to expect.
2. < head >
The < head > element is a container for metadata and is placed between the < html > and < body > tag.
The following elements can go inside the element:
- < title > -defines the title of the document. (required in every HTML document)
- < style > - used to define style information (CSS) for a document.
- < base > - specifies the base URL and/or target for all relative URLs in a document.
- < link > - defines the relationship between the current document and an external resource
- < meta >
- < script > - used to embed a client-side script (JavaScript).
- < noscript > - defines an alternate content to be displayed to users that have disabled scripts in their browser or have a browser that doesn't support script.
3. < meta >
The < meta > tag defines metadata about an HTML document.
< meta > tags always go inside the < head > element, and are typically used to specify character set, page description, keywords, author of the document, and viewport settings.
Metadata is used by browsers (how to display content or reload page), search engines (keywords), and other web services.
4. < body >
The < body > tag defines the document's body. The
element contains all the contents of an HTML document, such as headings, paragraphs, images, hyperlinks, tables, lists, etc.
Tags and attributes
All HTML pages have a series of HTML elements, consisting of a set of tags and attributes. A tag tells the web browser where an element begins and ends, whereas an attribute describes the characteristics of an element.
The three main parts of an element are:
- Opening tag – used to state where an element starts to take effect. The tag is wrapped with opening and closing angle brackets. For example, use the start tag
<p>to create a paragraph. - Content – this is the output that other users see.
- Closing tag – the same as the opening tag, but with a forward slash before the element name. For example,
</p>to end a paragraph.
The combination of these three parts will create an HTML element.
Some important tags :
- Heading tags – these range from
<h1>to<h6>, where heading h1 is largest in size, getting smaller as they move up to h6. - Paragraph tags – are all enclosed by using the
<p>tag. List tags – have different variations. Use the
<ol>tag for an ordered list, and use<ul>for an unordered list. Then, enclose individual list items using the<li>tag.Div tags- defines a division or a section in an HTML document. It is used as a container for HTML elements - which is then styled with CSS or manipulated with JavaScript.
<a>tags- The<a>tag defines a hyperlink, which is used to link from one page to another. The most important attribute of the element is the href attribute, which indicates the link's destination.- Table tags – defines an HTML table. An HTML table consists of one
<table>element and one or more<tr>,<th>, and<td>elements. The<tr>element defines a table row, the<th>element defines a table header, and the<td>element defines a table cell.
- Form tags - used to create an HTML form for user input.
The HTML
<input>element is the most used form element.
An <input> element can be displayed in many ways, depending on the type attribute.
Let us see all of the input attributes:
>> Label:
The <label> tag defines a label for many form elements.
The <label>element is useful for screen-reader users,
because the screen-reader will read out loud the label
when the user focus on the input element.
<form>
<label for="name">name:</label>
</form>

The <label> element also help users who have difficulty clicking on very small regions (such as radio buttons or checkboxes) - because when the user clicks the text within the <label> element, it toggles the radio button/checkbox.The for attribute of the tag should be equal to the id attribute of the element to bind them together.
>>Text Fields:
The <input type="text"> defines a single-line input field for text input. There are different types of text fields namely password, email, textarea, etc.
Example: A form with input fields for text
<form>
  <label for="name">name:</label>
  <input type="text" id="name" name="name">
</form>

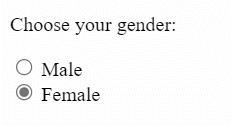
>> Radio Buttons:
The <input type="radio"> defines a radio button.
Radio buttons let a user select ONE of a limited number of choices.
Example: A form with radio buttons:
<form>
  <p>Choose your gender:</p>
  <input type="radio" id="male" name="gender" value="male"/>
  <label for="male">Male</label><br>
  <input type="radio" id="female" name="gender" value="female"/>
  <label for="female">Female</label><br>
</form>
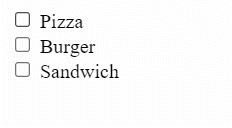
>>Checkboxes:
The <input type="checkbox"> defines a checkbox.
Checkboxes let a user select ZERO or MORE options of a limited number of choices.
Example: A form with Checkboxes:
<form>
  <input type="checkbox" id="food1" name="food1" value="pizza"/>
  <label for="food1"> Pizza</label><br>
  <input type="checkbox" id="food2" name="food2" value="burger"/>
  <label for="food2"> Burger</label><br>
  <input type="checkbox" id="food3" name="food3" value="sandwich"/>
  <label for="food3">Sandwich</label>
</form>
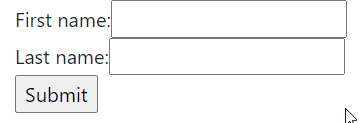
>>The Submit Button:
The <input type="submit">defines a button for submitting the form data to a form-handler. The form-handler is typically a file on the server with a script for processing input data. The form-handler is specified in the form's action attribute.
<form action="action_page.js">
  <label for="fname">First name:</label>
  <input type="text" id="fname" name="fname"/ >
  <label for="lname">Last name:</label>
  <input type="text" id="lname" name="lname" /><br>
  <input type="submit" value="Submit" />
</form>
HTML Form Attributes:
The Action Attribute:
The action attribute defines the action to be performed when the form is submitted. Usually, the form data is sent to a file on the server when the user clicks on the submit button.
Note: If the action attribute is omitted, the action is set to the current page.
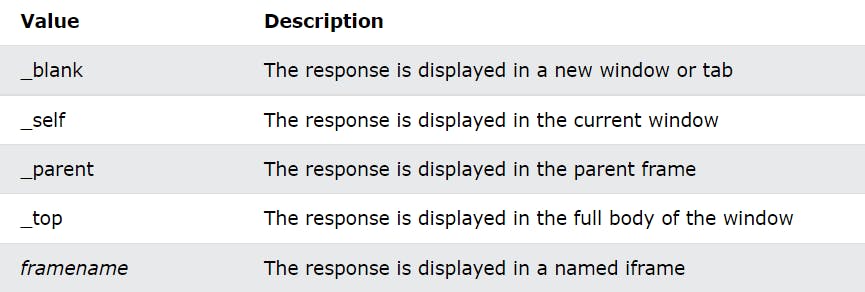
The Target Attribute:
The target attribute specifies where to display the response that is received after submitting the form. The target attribute can have one of the following values:
The Method Attribute:
The method attribute specifies the HTTP method to be used when submitting the form data.
The form-data can be sent as URL variables (with method="get") or as HTTP post transaction (with method="post").
The default HTTP method when submitting form data is GET.
Notes on GET:
- Appends the form data to the URL, in name/value pairs
- NEVER use GET to send sensitive data! (the submitted form data is visible in the URL!)
- The length of a URL is limited (2048 characters)
- Useful for form submissions where a user wants to bookmark the result
- GET is good for non-secure data, like query strings in Google
Notes on POST:
- Appends the form data inside the body of the HTTP request (the submitted form data is not shown in the URL)
- POST has no size limitations, and can be used to send large amounts of data.
- Form submissions with POST cannot be bookmarked
Emmet — the essential toolkit for web-developers:
Emmet (formerly Zen Coding[1]) is a set of plug-ins for text editors that allow for high-speed coding and editing in HTML, XML, XSLT, and other structured code formats via content assist.
You can learn more about emmet here : https://docs.emmet.io/
Img, Video, Audio tags in HTML:
>>Image Tag:
The <img> tag is used to embed an image in an HTML page.
Images are not technically inserted into a web page; images are linked to web pages. The <img>tag creates a holding space for the referenced image.
The <img> tag has two required attributes:
- src - Specifies the path to the image
- alt - Specifies an alternate text for the image, if the image for some reason cannot be displayed
Note: Also, always specify the width and height of an image.
>>Audio Tag:
The <audio> tag is used to embed sound content in a document, such as music or other audio streams.
The <audio> tag contains one or more tags with different audio sources. The browser will choose the first source it supports.
The text between the <audio> and </audio> tags will only be displayed in browsers that do not support the element.
There are three supported audio formats in HTML: MP3, WAV, and OGG.
>>Video Tag:
The <video> tag is used to embed video content in a document, such as a movie clip or other video streams.
The<video> tag contains one or more <source> tags with different video sources. The browser will choose the first source it supports.
The text between the <video>and </video>tags will only be displayed in browsers that do not support the<video> element.
There are three supported video formats in HTML: MP4, WebM, and OGG.
Conclusion:
Hope the above-described concepts are clear to you. Thank you for reading my article. Any feedback is appreciated :).
Cheers 🍻